Filters control which data flows through your workflow, ensuring only data that meets your specific conditions triggers subsequent actions. This powerful feature helps you build precise, efficient automations that process only relevant information.
Time to complete: 10-15 minutes
Difficulty: Beginner
Prerequisites: Understanding of basic Konnector creation and trigger configuration
What You'll Need
Before you begin, ensure you have:
An active Konnectify account with an existing Konnector
A Konnector with at least one trigger configured
Understanding of the conditions you want to apply to your data
Knowledge of the field values you want to filter
Understanding Filters
Filters in Konnectify allow you to add conditional logic to your workflows, ensuring only data that meets specific criteria continues through your Konnector. This enables you to:
Process only relevant data that matches your business rules
Prevent unnecessary actions from executing
Reduce noise by filtering out unwanted records
Create precise, targeted automations
Save execution time and resources
Key Components of Filters
Filter Node – A conditional checkpoint in your workflow
Match Logic – ALL or ANY condition matching
Conditions – Specific rules that data must meet
Field Selection – Which data fields to evaluate
Operators – How to compare field values
Values – What to compare against
When to Use Filters
Filters are ideal for scenarios such as:
Priority-based processing: Only process high-priority tickets or urgent requests
Value-based routing: Handle leads above a certain deal value differently
Status filtering: Process only records with specific statuses
Time-based conditions: Filter based on dates, deadlines, or timestamps
Quality control: Ensure data meets quality standards before processing
Selective automation: Execute actions only for specific conditions
Step 1: Add a Filter to Your Konnector
Access Filter Options
Open your existing Konnector in the Konnectify editor
Ensure your trigger is configured - You must have a trigger set up before adding filters
Click the + button below your trigger node
You'll see several options displayed:
Filter – Add conditions to filter data
Apps – Add an action directly
Code – Write custom JavaScript
(Other available options)
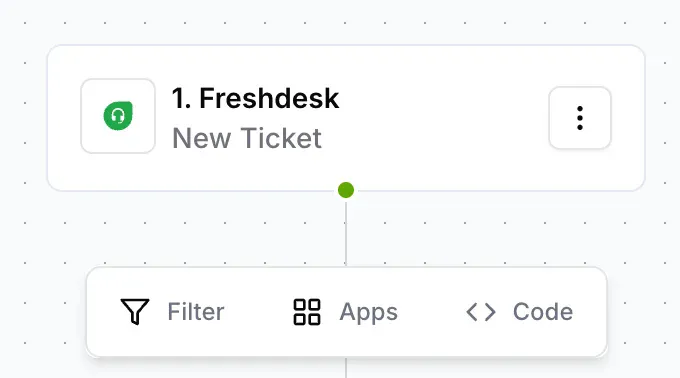
Click Filter to add a filter node to your workflow
Step 2: Access the Filter Configuration Panel
After selecting Filter, the configuration panel opens on the right side.
Understanding the Configuration Interface
The "Configure rules" panel displays with:
Filter Node label at the top
Match logic selector (ALL or ANY)
Condition builder section
Continue button at the bottom
Your workflow canvas now shows:
Node 1: Your trigger (e.g., Freshdesk - New Ticket)
Node 2: Filter - (Initially showing "No conditions" or ready for configuration)
Step 3: Choose Your Match Logic
The match logic determines how multiple conditions are evaluated. Konnectify offers two options:
Match ALL Conditions (AND Logic)
At the top of the configuration panel, you'll see: Match with two options: ALL | ANY
Click ALL if you want data to pass through only when all conditions are met
When ALL is selected:
Every condition must be true for the filter to pass
Data failing any single condition will be stopped
This creates strict, precise filtering
Example: Filter for high-priority tickets that also have a response time greater than 2 hours
Both conditions must be true for the filter to pass
Match ANY Condition (OR Logic)
Click ANY if you want data to pass through when at least one condition is met
When ANY is selected:
If any single condition is true, the filter passes
Data only needs to match one condition to continue
This creates broader, more flexible filtering
Example: Filter for either high-priority tickets OR tickets with long response times
If either condition is true, the filter passes
Step 4: Create Your First Condition
Define the Condition
Under Condition, locate the Field input (marked with *)
Click "Enter text or insert fields"
Select the field from your trigger data that you want to evaluate
Example: Priority, Status, Response Time, Deal Value, Category
Select the Operator
Under Operator, click the dropdown to select how you want to compare the field:
Available Operators:
Is equal to – Field exactly matches the value
Is not equal to – Field does not match the value
Is greater than – Numeric field exceeds the value
Is less than – Numeric field is below the value
Contains – Field includes the specified text
Does not contain – Field excludes the specified text
Starts with – Field begins with the specified text
Ends with – Field concludes with the specified text
Is empty – Field has no value
Is not empty – Field contains any value
In the screenshot example, "Is greater than" is selected
Enter the Value
Under Value (marked with *), enter or select the value to compare against
You can enter static text or numbers
Or insert dynamic fields from your trigger data
In the example shown:
Field: First Response Due By
Operator: Is greater than
Value: 2 hrs
This condition checks if the response time is greater than 2 hours.
Step 5: Add Multiple Conditions (Optional)
You can create complex filtering logic by adding multiple conditions.
Add Another Condition
Below your first condition, you'll see a connector label: AND or OR
AND appears when Match ALL is selected
OR appears when Match ANY is selected
The second condition section appears with the same structure:
Field (marked with *)
Operator
Value (marked with *)
Configure the second condition following the same process
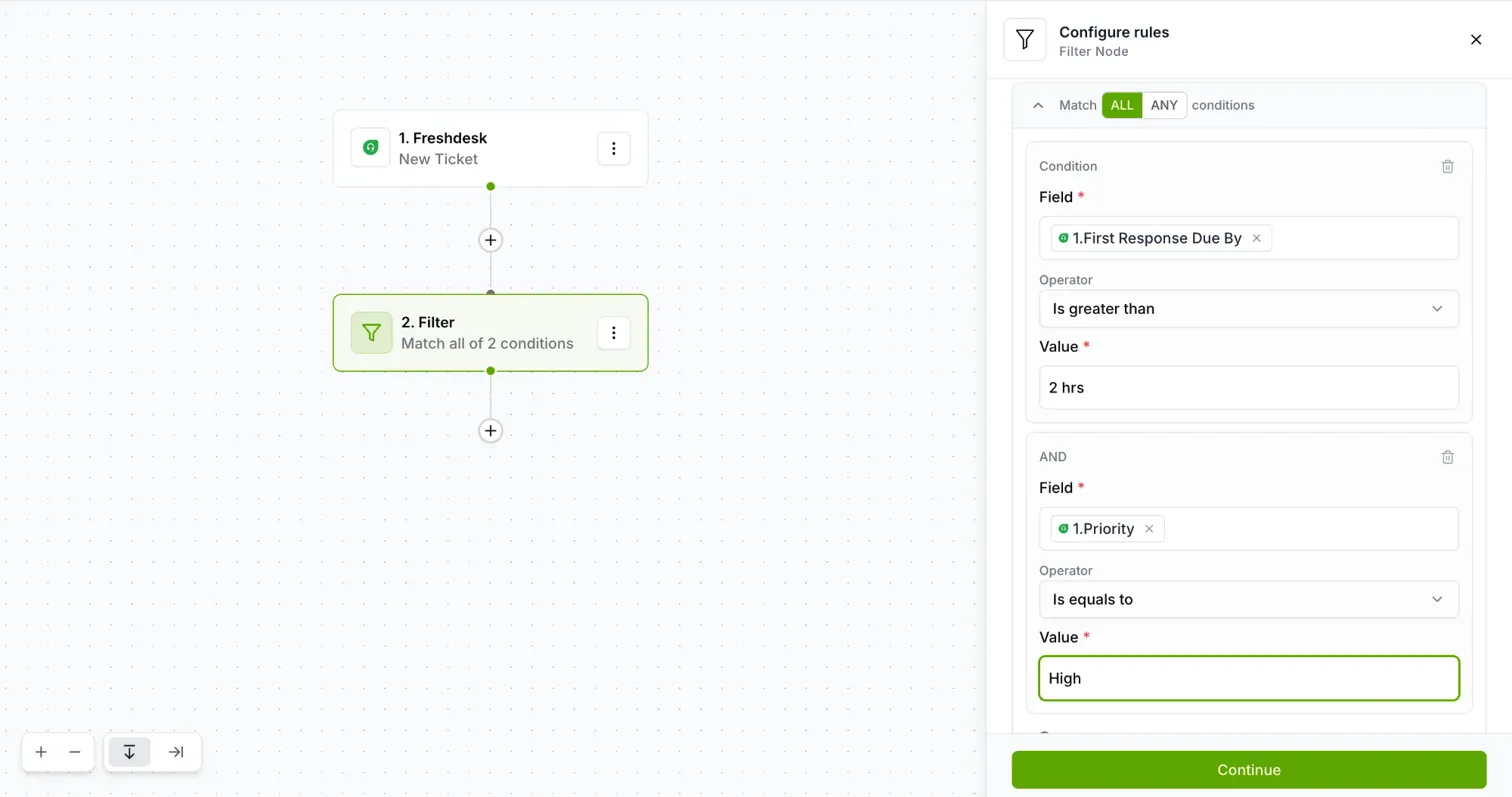
Example: Multiple Conditions with Match ALL
Scenario: Filter for urgent tickets with high priority
Match: ALL conditions
Condition 1:
Field: First Response Due By
Operator: Is greater than
Value: 2 hrs
AND
Condition 2:
Field: Priority
Operator: Is equal to
Value: High
Result: Only tickets that BOTH have response time > 2 hours AND priority = High will pass through.
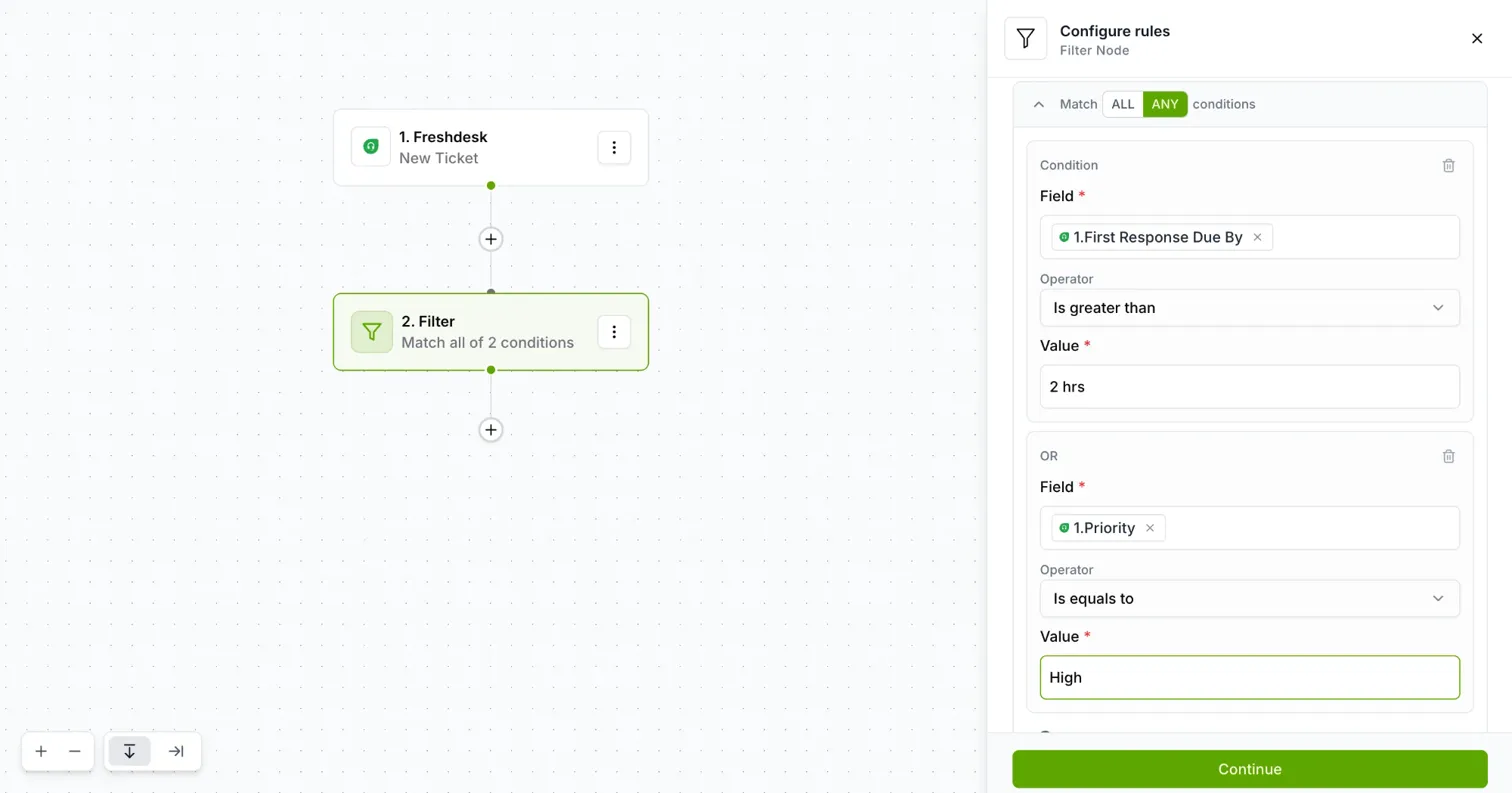
Example: Multiple Conditions with Match ANY
Scenario: Filter for either urgent response times OR high priority
Match: ANY conditions
Condition 1:
Field: First Response Due By
Operator: Is greater than
Value: 2 hrs
OR
Condition 2:
Field: Priority
Operator: Is equal to
Value: High
Result: Tickets that have EITHER response time > 2 hours OR priority = High will pass through.
Add More Conditions
Click the ⊕ Condition button (if available) to add additional conditions
You can delete any condition by clicking the trash icon on the right
Build as many conditions as needed for your filtering logic
Step 6: Save and Continue
Review Your Filter Configuration
Before proceeding, verify:
✓ Match logic (ALL or ANY) is set correctly
✓ All conditions have fields selected
✓ Operators match your intended comparison
✓ Values are entered correctly
✓ The logic achieves your filtering goal
Continue to Next Step
Click the Continue button at the bottom of the configuration panel
Your Filter node is now configured and active in your workflow
The workflow canvas shows:
Node 1: Trigger
Node 2: Filter (with conditions summary, e.g., "Match all of 2 conditions")
Step 7: Add Actions After the Filter
After your Filter is configured, add the actions that should execute for filtered data.
Add Your Action
Click the + button below your Filter node
Select Apps to add an action
Configure the action as you normally would:
Select the app
Choose the action event
Authenticate the connection
Map fields
Important: Only data that passes your filter conditions will trigger this action. Data that doesn't meet the filter criteria will stop at the filter node and won't execute subsequent actions.
Step 8: Test Your Filter
Before activating, test your filter to ensure it works as expected.
Testing Strategy
Use test data that should pass the filter conditions
Use test data that should fail the filter conditions
Run your Konnector and check execution logs
Verify:
Data meeting conditions triggers actions
Data not meeting conditions stops at the filter
Match logic (ALL/ANY) works as intended
Review Execution Logs
Navigate to your Konnector's execution history
Check which data passed through the filter
Verify data that was stopped by the filter
Adjust filter conditions if needed
Common Filter Configurations
Priority-Based Filtering
Filter only high-priority items:
Field: Priority
Operator: Is equal to
Value: High
Value-Based Filtering
Filter deals above $10,000:
Field: Deal Value
Operator: Is greater than
Value: 10000
Status-Based Filtering
Filter only open tickets:
Field: Status
Operator: Is equal to
Value: Open
Time-Based Filtering
Filter overdue items:
Field: Due Date
Operator: Is less than
Value: {{Current Date}}
Multi-Condition Filtering (ALL)
Filter enterprise leads from specific region:
Match: ALL
Condition 1: Deal Value > 50000
AND
Condition 2: Region = North America
Multi-Condition Filtering (ANY)
Filter urgent OR high-value items:
Match: ANY
Condition 1: Priority = Urgent
OR
Condition 2: Deal Value > 100000
Best Practices for Using Filters
Design Clear Filter Logic
Keep conditions simple and understandable
Use descriptive field names when available
Document complex filter logic for future reference
Test each condition individually before combining
Choose the Right Match Logic
Use ALL when data must meet every requirement
Use ANY when data needs to meet at least one requirement
Consider the business impact of false positives vs. false negatives
Test with real data to validate your logic
Optimize Filter Performance
Place filters early in your workflow to stop unnecessary processing
Use specific conditions rather than broad ones
Avoid overly complex nested logic when possible
Monitor filter effectiveness through execution logs
Handle Edge Cases
Consider what happens with null or empty values
Plan for unexpected data formats
Add conditions to handle missing fields
Test with edge case data
Maintain Your Filters
Review filter conditions regularly as business rules change
Update values when thresholds change
Remove outdated or unused conditions
Document why specific filters exist
Troubleshooting Filters
Filter Not Working as Expected
Verify field names: Ensure field names match exactly (case-sensitive)
Check operator choice: "Is equal to" vs "Contains" makes a big difference
Review match logic: Confirm ALL vs ANY is set correctly
Validate values: Ensure comparison values match data format
Data Passing Through When It Shouldn't
Check ALL/ANY logic: You might need stricter (ALL) conditions
Review operator selection: Ensure operators match your intent
Verify value accuracy: Check that comparison values are correct
Test individual conditions: Isolate which condition isn't working
Data Blocked When It Should Pass
Check for typos: Verify field names and values are exact
Review operator logic: Ensure operators aren't too restrictive
Consider data format: Numbers, dates, and text must match expected format
Check for null values: Missing data might fail comparisons
No Data Flowing Through
Verify filter is configured: Ensure conditions are actually set
Check trigger is firing: Confirm trigger events are occurring
Review execution logs: Look for specific error messages
Test without filter: Temporarily remove filter to isolate issue
What Happens Next?
After configuring filters in your Konnector:
Data automatically evaluates against your conditions when the trigger fires
Only data meeting your filter criteria proceeds to subsequent actions
Data not meeting conditions stops at the filter node
All filter decisions are logged in execution history
You can edit filter conditions at any time without affecting other workflow parts
Need Help?
If you encounter issues while using Filters:
Review execution logs to see which data passed/failed filters
Verify your filter logic matches your intended workflow
Test with sample data to validate conditions
Check that trigger fields are available for filtering
Contact Konnectify support for assistance with complex filter configurations
Was this article helpful?
That’s Great!
Thank you for your feedback
Sorry! We couldn't be helpful
Thank you for your feedback
Feedback sent
We appreciate your effort and will try to fix the article