Code Block - How to Use Code Block in Konnectify
Code Block allows you to write custom JavaScript code within your Konnectify konnectors, enabling advanced data transformations, custom logic, and complex operations that go beyond standard field mapping. This powerful feature gives you complete control over your data processing.
Time to complete: 15-20 minutes
Difficulty: Advanced
Prerequisites: Basic JavaScript knowledge and understanding of konnector creation
What You'll Need
Before you begin, ensure you have:
An active Konnectify account with an existing konnector
A konnector with at least one trigger configured
Basic JavaScript programming knowledge
Understanding of the data transformations you want to perform
Knowledge of input and output data structures for your workflow
Understanding Code Block
Code Block in Konnectify enables you to write custom JavaScript code as part of your workflow. This feature allows you to:
Transform and manipulate data in ways not possible with standard field mapping
Perform complex calculations and logic operations
Format data to match specific requirements
Parse and restructure JSON objects
Implement custom business rules and validations
Combine multiple data sources or fields with custom logic
Key Components of Code Block
JavaScript Code Editor – Where you write your custom code
Input Variables – Data passed from previous nodes in your workflow
Output Object – The result of your code that flows to the next node
Utility Packages – Pre-loaded libraries like lodash and moment for common operations
Test Function – Allows you to test your code before saving
When to Use Code Block
Code Block is ideal for scenarios such as:
Complex data transformations: Converting data formats, restructuring objects, or merging multiple fields
Advanced calculations: Mathematical operations, date calculations, or statistical computations
Data validation and cleanup: Checking data quality, removing duplicates, or standardizing formats
Conditional logic: Implementing complex business rules that require programming logic
API response parsing: Extracting specific data from nested JSON structures
String manipulation: Advanced text processing beyond basic field mapping capabilities
Step 1: Add a Code Block to Your konnector
Open your existing konnector in the Konnectify editor
In the workflow canvas, locate the point where you want to add custom code logic
Click the + button below the node where you want to process data
From the configuration options, select Code Block under the Tools section
A Code Block node is added to your workflow, showing:
The code icon
"Write custom JavaScript" description
A green highlight indicating it's ready for configuration
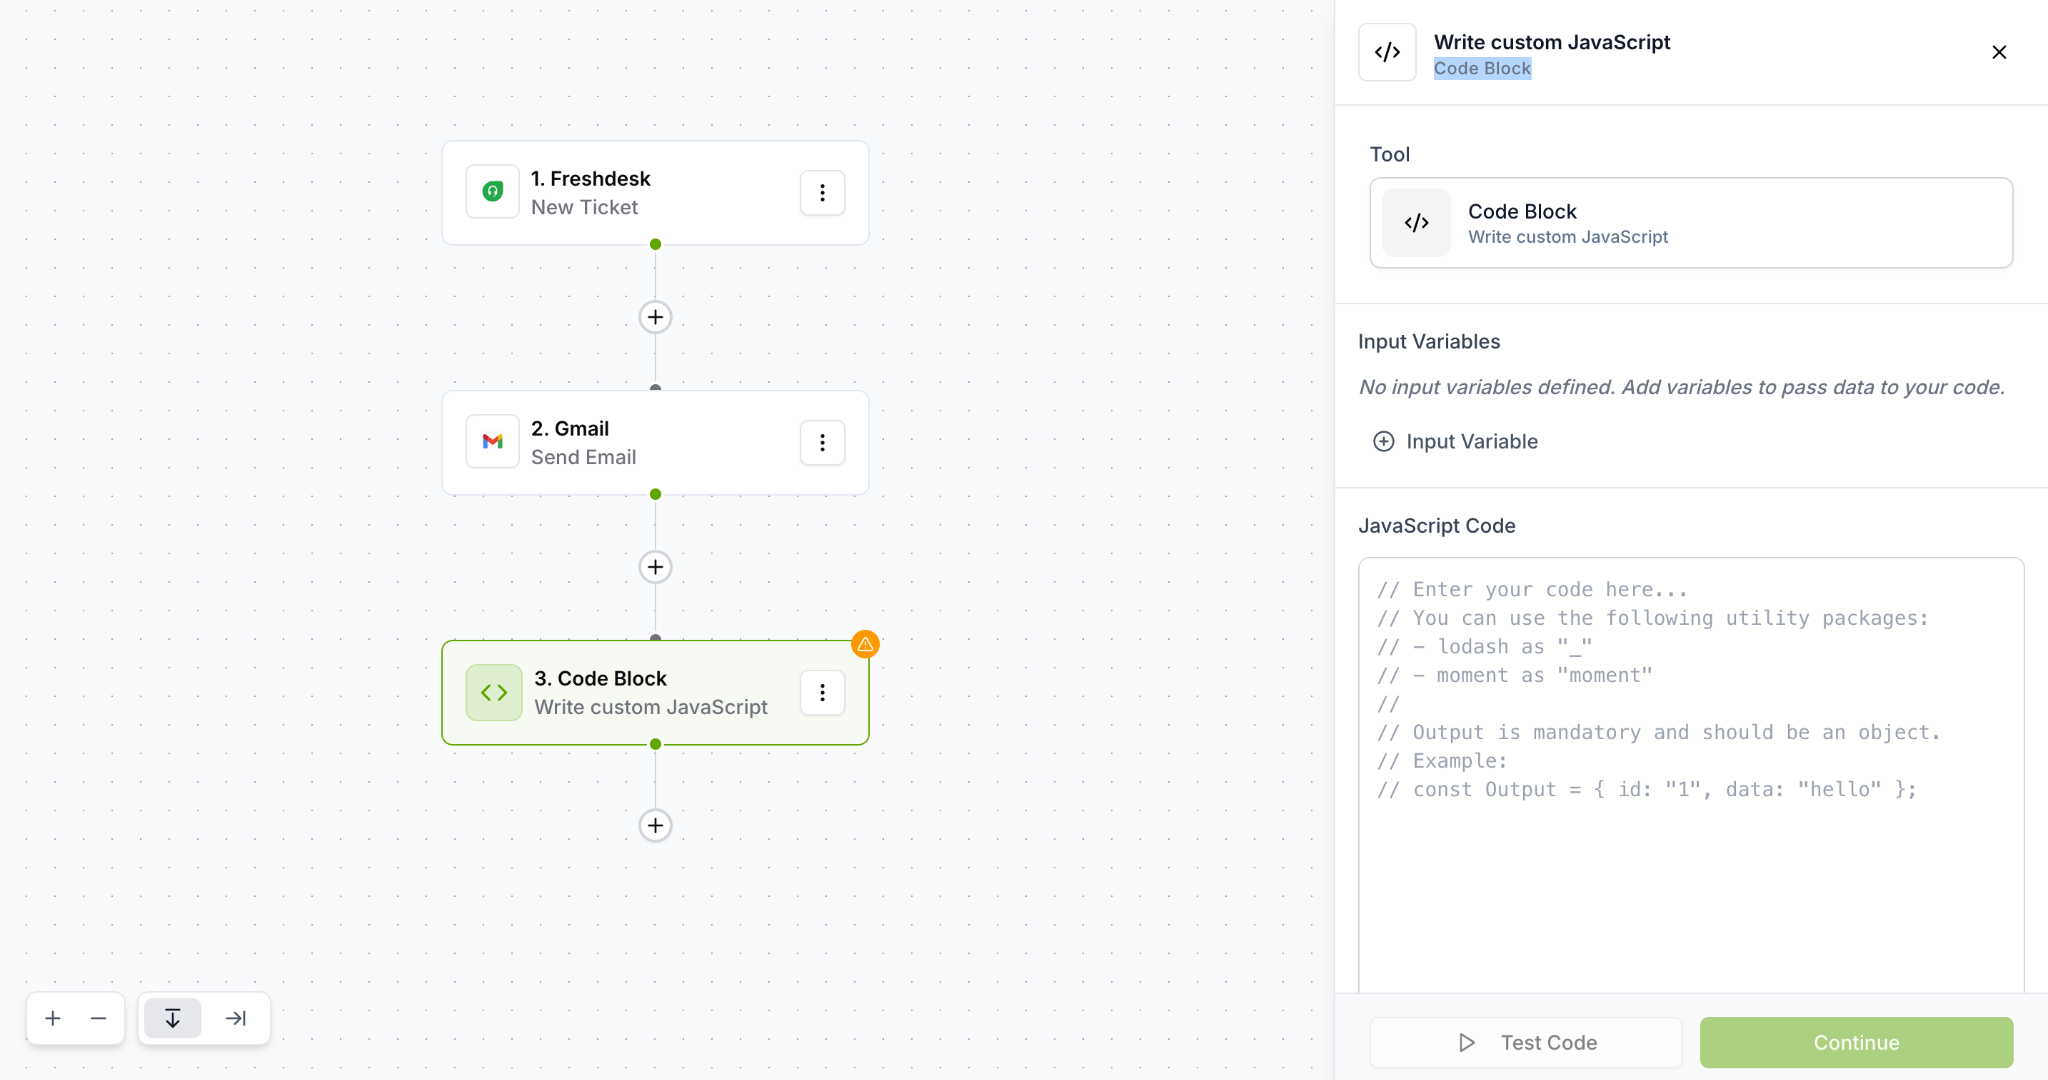
Step 2: Access the Code Block Configuration Panel
Click on the Code Block node you just created
The "Write custom JavaScript" panel opens on the right side
You'll see several sections:
Tool: Confirms you're using Code Block
Input Variables: Area to define data inputs
JavaScript Code: Editor where you write your code
Step 3: Define Input Variables
Input variables allow you to pass data from previous nodes in your workflow into your JavaScript code.
Add an Input Variable
In the Input Variables section, click the ⊕ Input Variable button
For each input variable, you'll need to specify:
Variable Name: The name you'll use in your code (e.g., ticketData, customerEmail)
Variable Value: The data from previous nodes to pass in
Click on the Variable Value field and select:
Fields from your trigger data
Fields from previous action nodes
Static values
Or a combination of these
Input Variable Best Practices
Use descriptive names: Choose clear variable names like ticketPriority instead of var1
Pass only needed data: Only create input variables for data you'll actually use in your code
Consider data types: Be aware of whether you're passing strings, numbers, objects, or arrays
Note: If no input variables are defined, you'll see the message: "No input variables defined. Add variables to pass data to your code."
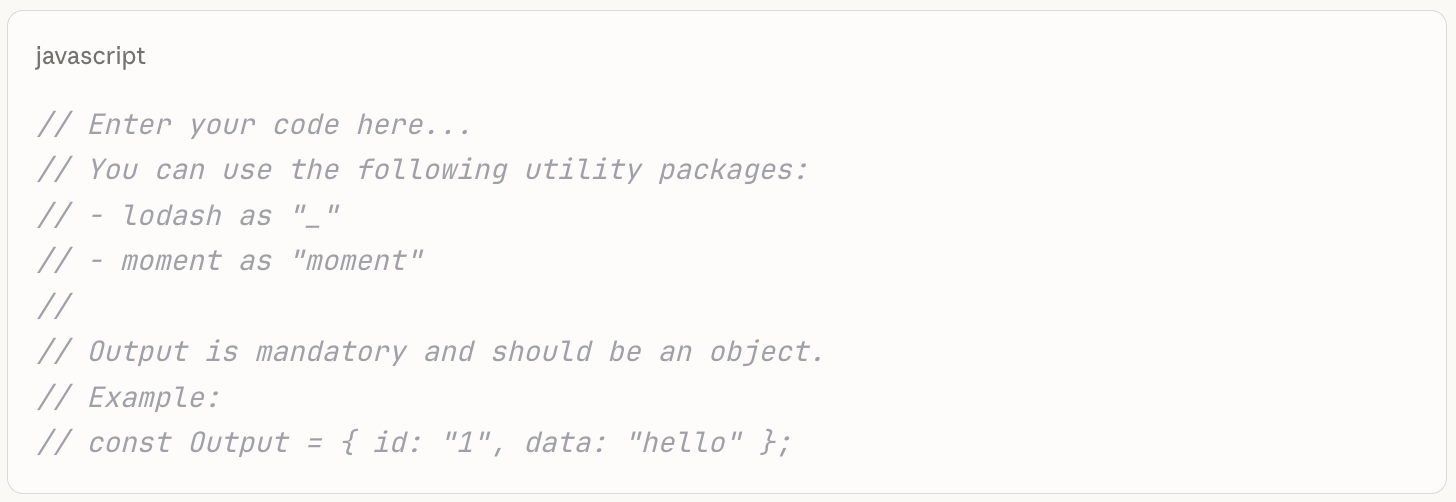
Step 4: Write Your JavaScript Code
The JavaScript Code section is where you implement your custom logic.
Understanding the Code Editor
The code editor includes helpful comments to guide you:
Available Utility Packages
Konnectify provides pre-loaded utility packages to make coding easier:
lodash (_) – Utility library for working with arrays, objects, and strings
moment (moment) – Library for parsing, validating, and formatting dates
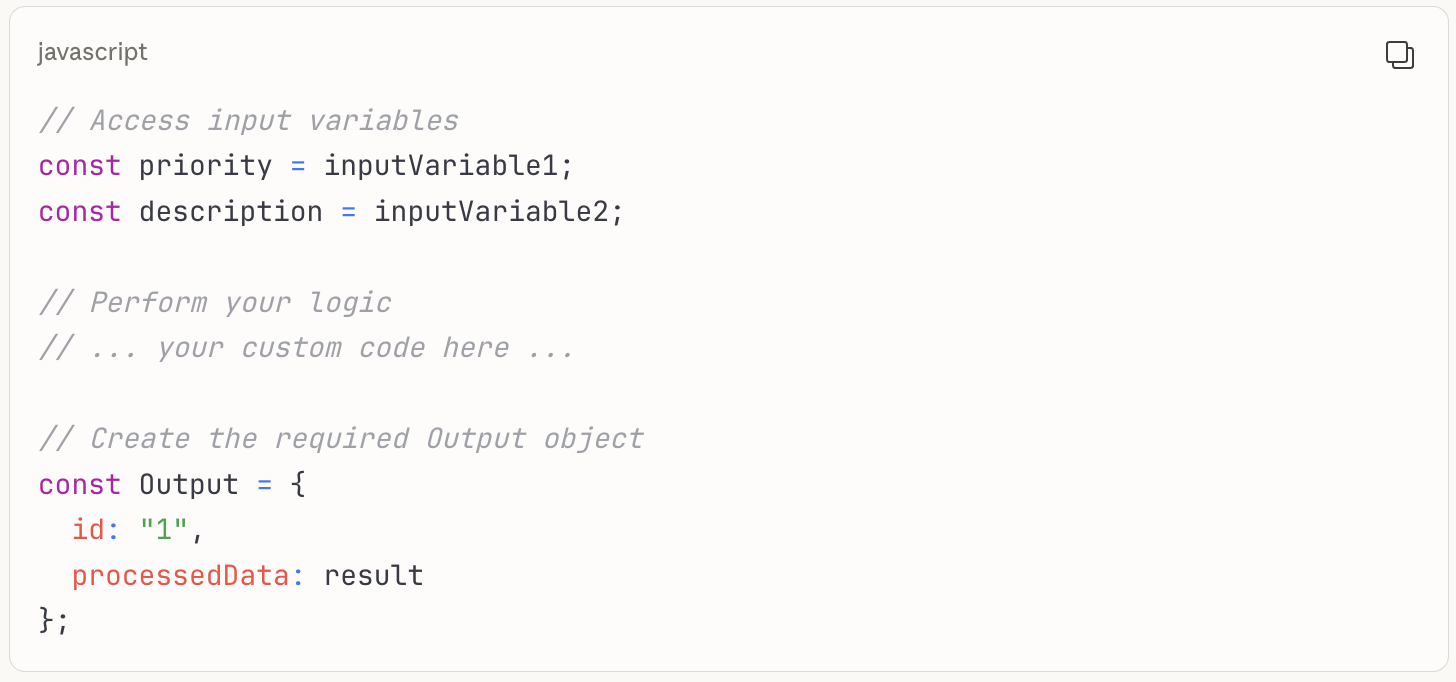
Writing Your Code
Access your input variables by their defined names
Implement your custom logic using JavaScript
Create an Output object with your results
The Output object is mandatory and must be an object
Code Structure Example
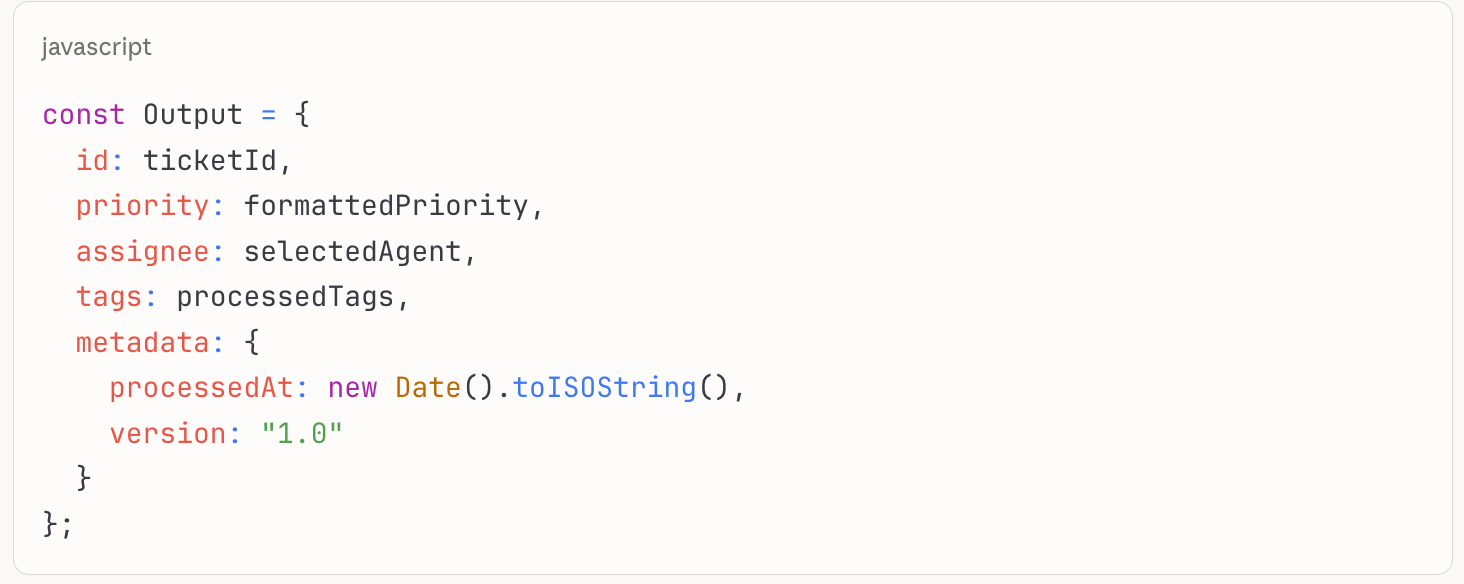
Step 5: Create the Output Object
The Output object is mandatory and determines what data flows to the next node in your workflow.
Output Object Requirements
Must be named Output (case-sensitive)
Must be an object (not a string, number, or array)
Can contain any structure you need for subsequent nodes
Should include all data that later nodes will require
Output Object Examples
Simple output:

Complex output:
Step 6: Test Your Code
Before saving, it's crucial to test your JavaScript code to ensure it works correctly.
Run a Test
Click the ⏵ Test Code button at the bottom of the panel
Konnectify executes your code with sample or recent data from your input variables
Review the test results:
Success: Your code runs without errors and produces an Output object
Error: Review the error message to identify and fix issues
Common Testing Issues
Missing Output object: Ensure you've created the Output variable
Syntax errors: Check for typos, missing brackets, or semicolons
Undefined variables: Verify input variable names match your code
Type errors: Ensure you're working with the correct data types
Step 7: Save and Continue
Once your code is tested and working correctly:
Click the Continue button in the bottom-right corner
Your Code Block node is now configured and ready
The workflow canvas updates to show your configured Code Block
Step 8: Connect to Subsequent Actions
After your Code Block, you can add actions that use the processed data.
Click the + button below your Code Block node
Add the action node you want to perform next
When configuring field mapping for the next action:
You can access fields from your Code Block's Output object
These appear as available fields from "Code Block"
Map them just like any other field data
Best Practices for Using Code Block
Keep Code Focused and Simple
Write code that does one thing well
Break complex operations into multiple Code Blocks if needed
Comment your code to explain logic for future reference
Handle Errors Gracefully
Add try-catch blocks for operations that might fail
Provide fallback values for error scenarios
Include error information in your Output object for debugging
javascript
try {
// Your code here
const result = performOperation(inputData);
const Output = { success: true, data: result };
} catch (error) {
const Output = {
success: false,
error: error.message,
data: null
};
}
Validate Input Data
Check that input variables have expected values
Handle null, undefined, or empty values
Provide sensible defaults when data is missing
Use Utility Packages
Leverage lodash for array and object operations
Use moment for date parsing and formatting
Don't reinvent functionality these packages already provide
Test Thoroughly
Test with various input data scenarios
Verify edge cases and unusual values
Ensure Output object structure matches what downstream nodes expect
Document Your Logic
Add comments explaining complex operations
Note any assumptions about input data
Document the structure of your Output object
Troubleshooting Code Block
Code Block Not Executing
Verify konnector is active: Inactive konnectors don't run
Check workflow sequence: Ensure Code Block is properly connected in the flow
Review trigger data: Confirm the trigger is firing and providing data
Output Not Available in Next Node
Check Output object name: Must be exactly Output (capital O)
Verify it's an object: Output must be an object, not a string or array
Ensure code completes: Make sure your code reaches the Output assignment
Syntax or Runtime Errors
Use Test Code function: Always test before saving
Check console messages: Error messages indicate the problem location
Verify variable names: Input variable names must match exactly
Review data types: Ensure operations match the data type (string, number, object)
Input Variables Not Working
Confirm variable definition: Input variables must be defined before use
Check field mapping: Ensure input variables are mapped to actual data
Verify data availability: Previous nodes must provide the data you're mapping
What Happens Next?
After configuring a Code Block in your konnector:
Your custom JavaScript executes each time the konnector runs
The Output object becomes available to subsequent nodes
Execution logs show whether the Code Block ran successfully
You can edit the code at any time by clicking on the Code Block node
Need Help?
If you encounter issues while using Code Block:
Review the execution logs for error messages
Test your code with the Test Code function before saving
Verify input variables are properly defined and mapped
Check that your Output object is correctly structured
Contact Konnectify support for assistance with complex code implementations
Was this article helpful?
That’s Great!
Thank you for your feedback
Sorry! We couldn't be helpful
Thank you for your feedback
Feedback sent
We appreciate your effort and will try to fix the article